How to Make a Steel Thread
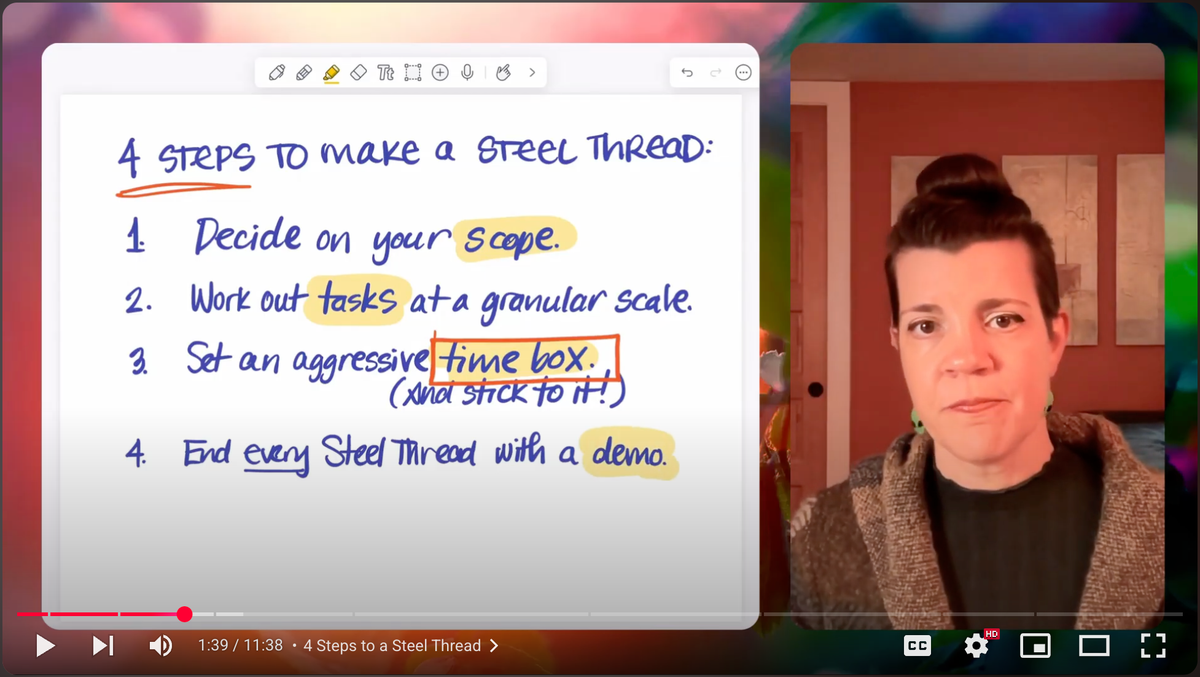
We finally get into the "how" of steel threads. I've distilled the process to 4 steps: scope, tasks, time box, demo.
Want help applying steel threads in your projects?
Register for the free interactive masterclass!
We're finally getting into the details of how to make a steel thread! The first two posts covered what a steel thread is and why to use them to accelerate progress on all kinds of creative work.
Before we dive in, here's a quick recap:
- Steel threads are an iterative approach to creative work. The method comes from software engineering (although even in tech, it's not well known).
- An individual steel thread is a miniature version of your whole project. You move through all the major steps of the project, doing a very slender version of each step.
- Using this approach helps you get clarity...
- ...it builds and sustains motivation...
- ...and it can improve the quality and frequency of the feedback you're getting as you build.
Steel threads don't eliminate uncertainty, ambiguity, or complexity, but they do help us navigate the unknown.
4 Basic Steps to a Steel Thread
I've distilled the process of making a steel thread to four steps:
- Decide on scope. What are the essential steps of your project? How deep do you need to go on each step for this steel thread?
- Write out the specific tasks for each step. I recommend doing this at a very granular scale, especially early in the process.
- Set an aggressive time box and stick to it. That means setting a deadline.
- Do a demo. The final step helps us stick to our deadline: we end each steel thread by showing our work to other people in a demo.
We'll explore each of these steps today. But keep in mind, this is a quick overview. I'm going to gloss some details that will matter if you start using this approach in your own work. But it's easier to grasp the basics if we keep things very simple.
Step 1: Decide on Scope
First, decide on your scope. This is, of course, easier said than done. I've found that a good starting point is just to ask: what are the basic steps to complete this project?
If I ask most people that question, they can pretty quickly write down a handful of key steps. And in the beginning, getting it "right" is much less important than getting moving. So if you're trying this out, just get something on paper that's very much in the spirit of steel threads.
When you're thinking about scope, think about how to make a version of your project that touches each step while being as small as possible.
Nothing beats a real world example. Here are the basic steps I broke down when I started working on this YouTube series:
- Make an outline or script
- Create visuals
- Record
- Edit
- Upload
- Publish
Now, left to my own devices. I can easily spend three weeks fussing with a single step, making fancy slides, agonizing over the script, doing all kinds of research. What's so powerful about the steel thread approach is that I had to move through all of the steps and I had to do it quickly.
For the first steel thread, I didn't write a full script; I just jotted down an outline that I could riff on.
My visuals were a simple slide deck.
"Publishing" meant sharing it with at least one person, which I was going to do anyway because: demos.
And so on.
Step 2: Break Down Granular Tasks
Once I identified my steps, I could write out the task list.
My rule of thumb during project planning is each task should be something I think will take at most a couple of hours. If I have a task that's much bigger than that, I break it down into smaller pieces. That's what I mean by "granular." The tasks should be grains of sand, not big boulders.
Your time estimates will be wrong.
And that is fine.
This process is about thinking things through as well as you can, then taking action to find out where you were mis-calibrated.
Let's look at the task list for my first YouTube video steel thread.
- Make an outline or script: I decided to draft an outline on paper. Estimate: 1 hour.
- Create visuals: I decided to start in Google Slides. Easy. Budgeting two hours meant I had to focus on key concepts instead of going down rabbit holes, finding graphics, or trying out 20 different fonts too early for that. Estimate: 2 hours.
- Record: Next I'd record a few rough takes. I figured that in an hour I could record three or four takes of a 10 minute video, and I decided to do those early takes in Zoom, mainly because there was zero startup cost. I use Zoom every day, so I wouldn't have to figure anything out. Estimate: 1 hour.
- Edit: I budgeted two hours to do a rough edit and cut in some stock music. Estimate: 2 hours. (Big surprise: it took... well, longer than two hours.)
- Upload: I decided to go ahead and upload to YouTube as a private video. This was a steel thread, not an MVP, not a finished product. I knew I wasn't ready to actually publish to the world, but I still wanted to go through the full process. Estimate: 1 hour.
- Publish: The last task would be the demo. I would share the private video with some reviewers and get some feedback. Estimate: 15 minutes.
This was my first time making YouTube videos, and I needed some new tools, so I opted for the fastest tools instead of the best tools. For example, I picked Ds script because I already kind of knew how to use it for editing, and I could always change to something else later.
Notice how I managed to create a fairly small task for each step of the project. I got a lot of momentum right out of the gate.
And I learned a lot: lighting, sound, pacing what I was doing during the recording that made editing harder later, lots of details about YouTube that I hadn't known about. I learned all of that in the very first week, which leads us to the importance of setting a time box.
Step 3: Set an Aggressive Time Box
A "time box" is just a way of saying: give yourself a deadline, and when you hit the deadline, stop. Even if you're not done.
This isn't a deadline for delivering a successful project. It's a deadline for stopping and reflecting.
Have you ever used the Pomodoro technique? It's where you set a timer (usually for 25 minutes) and work on just one thing. When the timer goes off, you stop, take a break, and make sure you're on the right track.
A steel thread's time box is kind of like a really big pomodoro.
(Read more about pomodoros on Forbes or the creator's site.)
How long should your time box be?
My rule of thumb: if you're giving yourself more than a week or two, you're probably making it too big. And if you're giving yourself less than a day, you're probably making it too small. There are exceptions, of course. But one week, maybe two, is usually the sweet spot.
Again, let's look at this in action. With my YouTube video, I knew I had probably underestimated how long things would take. (We usually underestimate time. I've learned to just factor that in.) I also had other projects in flight, so I couldn't focus exclusively on this deal thread.
In this example, I parallelized my YouTube video steel thread alongside a lot of other work. But sometimes it is important to focus exclusively on a steel thread during your time box. For example, if you have a team that's using steel threads to prototype a new product or feature, they'll probably make significantly more progress by focusing completely for one week instead of spending the equivalent amount of time spread over two or more weeks.
I figured I could:
- Monday: draft an outline
- Tuesday: draft the slides
- Wednesday: record a rough cut
- Thursday: edit the rough cut
- Friday: upload and share the video
One week for a steal thread. Perfect.
Now I could commit to my reviewers on Monday that I would be sending them something on Friday. That leads to step four...
Step 4: Schedule the Demo When You Start
Schedule your demo when you start.
Let me say that again: Schedule your demo when you start.
This is one of the easiest things to do logistically... and one of the hardest to do psychologically.
Honestly? I still resist doing this.
Scheduling a demo when you start is powerful and scary. You're leveraging social pressure, yes, but really it's a way to be accountable to yourself. Not "accountable" in the sense of, I'm gonna get in trouble if I'm mess this up.
No.
I think of accountability as "being able to give an account," to tell the story of what happened, and how.
If you schedule a demo on Friday and you don't have a complete draft ready to demo, you can still tell the story. What was difficult? What did you learn? What are you going to do differently next time?
Steel Threads Are Thin & Complete
If we look at how I used steel threads for these YouTube videos, you can see how it's possible to do a "thin" version of each step in a project.
My first script was just an outline.
My first slides were very boring Google Slides.
Publishing didn't mean "publishing to the world"; it was as simple as sending a link out to a handful of trusted advisors.
The next two posts in this series are going to go deeper into the topic of demos: choosing the right audience, managing stakeholders, processing feedback.
These are really important things to get right, because you can get discouraged or even derailed if you don't know how to manage demos well.
A Steel Thread Exercise
That's the quick tour of how to make a steel thread. So let's take on a more ambitious exercise.
Choose a specific project.
Write down the steps that would make it a complete project. (Aim for 5-6 steps.)
Write out the simplest, thinnest set of tasks for each step.
Pick a time box. Whatever seems doable. (When in doubt, go with one week.)
Identify 1-2 people that you trust to show a really rough version of your project to.
That's your first steel thread.
And if you do this and it goes completely awry... if you give yourself a week and you only get.... 10% of the work done? 🎉 Congratulations! You've done something. You've learned something.
Now you get to take what you've learned and apply it to your second steel thread.
In the next post, we'll get into what makes a great steel thread demo, and how to avoid the pitfalls of live demos.
Join my Free Masterclass
Do steel threads sound exciting, but you want help applying them?
This summer, I’m offering a free masterclass on how to make better things faster with steel threads.
The only way to really learn a practical method like this is by doing. So I’m offering an interactive masterclass, not a webinar. You’ll be in a Zoom call where you can turn on your mic and camera and get live coaching about where you’re getting stuck and how to design your own Steel Threads.
Classes are small, so if this sounds exciting, sign up for a spot soon.